While I am waiting for the Eye's PCB to arrive, I thought it best to start designing the head.


|
| The slip ring enables the wire to be rotated without getting tangled up. |

I want the head to nod as well as rotate, I will be using two small geared 6
volt motors.

To control these two motor I am using a cut down driver board I made for the
Arms.

As I am using DC motors I need to make some thing to give feedback as to the
position of the neck rotation and nod position.
To do this I am going to make similar sensors I used with the
Arms.
I will be using Magnets and the 3144 Hall Effect Sensors.

For the Neck Plate on which every thing rotates, I have placed Magnets all
around the edge.

|

This part also needs limit switches, so that the base of the head does not hit the rotation platform.

I have done a simple program to check some of its movements so far.
Here's a video I made testing its movements:
Added a few parts:

Added some teeth hehe:


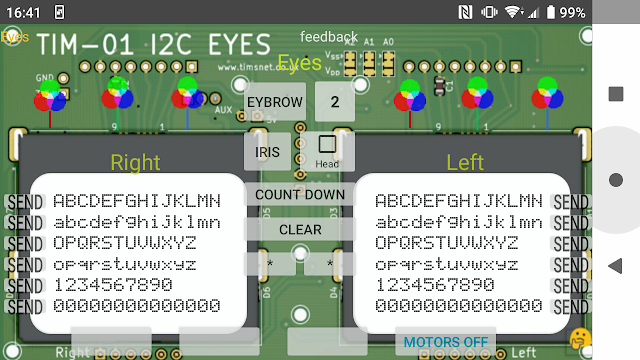
I have finished the Eyes PCB. Here:
TIM-01 Eyes.
Now I want to add some Eye Brows.
I incorporated an Auxiliary switch into the Eyes PCB, so that I could add a
solenoid to move the Eye brows.

The Eyebrows pivot on a wire spindle and are lifted by wires attached to
a solenoid inside the head.

- Head Movement

The next two, I thought I would try and emulate the actual devices.

Also with the last two, I wanted to get the text to look as it does on the devices.
- Eyes

- Mouth

Also with the last two, I wanted to get the text to look as it does on the devices.
I thought I would have to make two fonts, but as it turned out both
the 2x16 LCD and the Nokia screens have the same font.
So I only had to create one font.
If anyone would like a copy of the font, it's here:
Tims_8x6_Matrix.ttf
So far I have only done ASCII characters 32 to 127.
The 2x16 screen is the Chinese version, (Character Patterns - ROM
Code: A00) which has Chinese characters after ASCII number 61. There
are no characters between ASCII 127 and 60.
As for the Nokia Screens, I have only created ASCII characters 32 to
126 in the Arduino Library I made for the TIM-01 EYES.
Time fore a video demonstration.